
In this article, we’re going to take a look at how to set-up a development environment for Woocommerce, by the time we’ve finished we should have an environment that will allow us to –
- Quickly spin up a fresh Woocommerce site that includes test data
- Edit code productively using an IDE
- Step through code using a debugger
To set-up our test dev environment we will use the following tools –
Click here for more details about the "Learning WooCommerce Development By Example" book
- Local by Flywheel (a tool that allows us to easily create development websites)
- Visual Studio Code (a code IDE)
Local by Flywheel
Local by Flywheel allows us to spin up new development environments quickly and easily. If you didn’t use a tool such as Local you would need to install a web server and a database server on your local machine. You would then need to configure the web server to run multiple sites, then install WordPress and Woocommerce on each of these sites, and also go through the process of setting up the database server.
Local removes a lot of these complications by letting you set up websites, without needing to install a web or database server. It also allows you to create websites based on templates, so you only need to perform set-up steps once and then you can repeatedly use them via the templating system. So let’s take a look at how we can set-up Flywheel.
Firstly download and install Flywheel from https://local.getflywheel.com/. You can download a free version of the software for either Windows or Mac.
After you’ve downloaded Local, run through the install process, it’s fairly straightforward so I won’t go through it here. Once Local is installed we can start setting up a website.
Local makes setting up a site really simple, firstly, input your site’s name

Local will then ask if you want to create a “Preferred” or “Custom” site, choosing “Preferred” is slightly quicker but Local only provides debug support for “Custom” sites, so we’ll choose that option.

Once you’ve chosen Custom it’s fine just to accept the defaults. You’ll then be asked to provide a WordPress username and password for the site, so enter these and then click “Add Site”.

Local should then go ahead and set up the site for you, once it’s done you’ll see the site listed in the left-hand side of the screen.

You should now also be able to view the site in a browser.

Now we have a WordPress site, we’ll install Woocommerce, this will allow us to take a blueprint of the site later and then we will be able to create future sites using that Blueprint. This allows us to quickly get to a point where we have a clean install of Woocommerce ready to develop and test on.
To install Woocomerce search for it from the Plugins page in the admin area of WordPress, then install and activate it. You’ll need to fill in the store details following the activation.
I typically use the Storefront theme so after installing Woocomerce I install that, but you can go ahead and install a different theme if you prefer.
Finally, I install some sample product data as this allows for quick and easy testing of code snippets and plugins. To do this, navigate to the “Products” page in the admin area of Woocommerce. You should see an “Import products from a CSV file” button.

Click the button and you’ll be prompted to choose a CSV file to upload

When you install the Woocommerce plugin it comes with some sample product data, so we can use that to set our products up. If you’ve been following up to now on a Windows machine and not changed any of the defaults you should find the sample product data here “C:\Users\<your user name>\Local Sites\testsite\app\public\wp-content\plugins\woocommerce\sample-data”, select the “sample_products.csv” file and then keep accepting the defaults on the next few screens until you see the done message.
We should now have a Woocomerce store set-up with sample products.

So let’s move on to setting up the code IDE.
Visual Studio Code
You can download Visual Studio Code from here.
Once Visual Studio Code has been installed, we need to open the website we just created. Choose “Open Folder” from the file menu and open the folder containing the new website. If you’re on a Windows machine then the website should be in a folder similar to this “C:\Users\<your user name>Ian\Local Sites\testsite\app\public”.
Once you’ve opened the folder click the debug icon on the left of the screen to open the debug tab

At the top of the debug tab you’ll see a drop-down list containing the text “Add Configuration…”, open the list and choose the “Add Configuration…” option

Then choose “More…”

You’ll be presented with a list of extensions

Find the “PHP Debug” extension and click the “Install” button.
Now choose “Add Configuration…” again and then choose the “PHP” option.
You’ll now be shown a configuration script named “launch.json”, delete the contents from that file and copy in the text below.
{
    // Use IntelliSense to learn about possible attributes.
    // Hover to view descriptions of existing attributes.
    // For more information, visit: https://go.microsoft.com/fwlink/?linkid=830387
    "version": "0.2.0",
    "configurations": [
        {
            "name": "Listen for XDebug",
            "type": "php",
            "request": "launch",
            "port": 9000,
            "pathMappings": {
                "/app/public": "${workspaceFolder}",
            },
            "xdebugSettings": {
                "max_children": 256
            },
            "log": false,
        },
        {
            "name": "Launch currently open script",
            "type": "php",
            "request": "launch",
            "program": "${file}",
            "cwd": "${fileDirname}",
            "port": 9000
        }
    ]
}
Once these changes have been saved we need to make a change to the “php.ini” file, if you’ve been following along on a Windows machine you should find the file here “C:\Users\<your user name>\Local Sites\testsite\conf\php\7.0.3\php.ini”. In the file search for the text “[Xdebug]”, that should bring you to a set of configuration settings, add the following line to the end of those settings.
xdebug.remote_autostart = 1
Finally, we need to install the “XDebug helper” plugin for Google Chrome that will help us to debug, you can find the extension here
We should now be all set-up for debugging, to help us test let’s add some code to the “functions.php” file. You should be able to find the function file in the following place in the directory tree in Visual Studio Code “wp-content\themes\storefront” (you’ll obviously need to go to a different directory if you did not install the Storefront theme :)).
Once you’ve found the file add the following code after the first “<?php” script tag in the file
add_filter( 'posts_request', 'dump_request' );

function dump_request( $input ) {
    return $input;
}
The script will fire every time the “posts_requests” filter fires, the script has no functional use so you should remove it once you’re happy that debugging is working.
Once you’ve added the code we need to add a breakpoint, you can do this by clicking in the left-hand-side gutter of the text editor in Visual Studio Code. After clicking, a red dot should appear as below.

Before we try and get the code to stop at the breakpoint, we need to set-up the “XDebug helper” Chrome Extension we installed earlier. All we need to do is click the “bug” icon and then click “Debug”.

We now need to get Visual Studio Code to listen for our breakpoints, we can do this by clicking the green arrow next to the “Listen for XDebug” text in debug panel of Visual Studio Code.

On clicking the arrow you should see a toolbar appear similar to the one below

Now when you call the shop page of the site we created you see the breakpoint get hit (a yellow arrow will appear around the red dot – as below). You are now free to inspect variables and step through your code to your heart’s desire.

Turning The Site into a Blueprint
Now we have everything set up we can create a blueprint from our new site, this will allow us to easily spin-up a Woocommerce site that is ready to debug. As everything we have set up so far will be included in the sites blueprint we shouldn’t have to repeat any of the steps again, we can just create a new site from the blueprint and we’re ready to go.
To create a blueprint right-click the sites name in the left-hand “Local Sites” panel of Local

On the next screen enter a name for the blueprint and then click the “Save Blueprint” button. Local should now save the blueprint for future use.
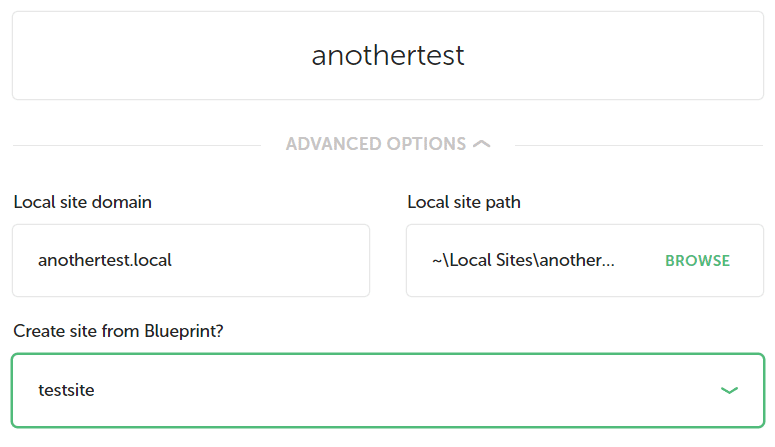
Having saved our blueprint we can use it to create a new site, just click “Advanced Options” on the add site screen.

Conclusion
So we have seen how we can use Local by Flywheel and Visual Studio Code to easily create new websites and debug them. We can also drastically cut down on the time it takes us to install plugins and themes.
Hopefully, this guide will help you to setup development sites in the future, if you have any questions or queries I’d love to hear them in the comments.
Click here to enroll in our Free WooCommerce Coding Course